1) Introduction
This blogpost will explain my workflow for shooting deepsky objects and collecting data (“light frames”) during an astrophotography session.
If you’re interested;
- the first post of this series explains the “three astrophotography conditions“
- the second post of this series covers everything around planning an astrophotography session
You can see all posts of the series “Plan to Pre-Process” here.
Sidenote; I’m a hobby/amateur astrophotographer. It’s my intention to highlight the basic aspects of astrophotography and explain them to beginners. In other words it’s my hobby and I’m maintaining this website in my free time. So bare with me if some content is outdated, at the time of writing I’m showing what I’m doing to achieve results that I’m happy with. Those blog entries are written in English and are automatically translated into German with DeepL.
2) A brief overview of the different frame types
Before I start explaining my astrophotography session in Sequence Generator Pro, let me briefly explain the different frame types you’ll come across. I’ll divide them in two categories, so it’s easier to understand.
2.1) Frames, that contain deepsky object information (the “real” image)
How many light frames you shoot depends on the “three astrophotography conditions“. As a tip: have a look into Astrobin and search/filter for your deepsky object and how others collected data.
- a “light frameA "light frame" is basically an image that contains all the information you want to have in your final picture, e.g. a nebula, a galaxy, a comet. More” is basically an image that contains all the information you want to have in your final picture – a nebula, a galaxy, a comet, …
That’s all :)!
2.2) Frames, that are used for calibrating your light frames;
In general, I take 50 of each of the following frames and stack them into so called “Masters“. Those calibration frames allow you to (mathematically) remove a variety of confounding factors from your light frames.
- a “flat frameA "flat frame" is shot against a bright surface and contains vignetting and all the "bad" things (e.g. dust particles) that block/disturb your light train. The combination/stack of multiple flat frames is called a "Master Flat". More” (Master Flat) contains vignetting and all the “bad” things (e.g. dust particles) that block/disturb your light train.
- a “darkflat frameA "darkflat frame" is basically the same as a flat frame with the same exposure and camera settings, but shot in the dark. They are used to calibrate the flat frames. The combination/stack of multiple darkflat frames is called a "Master DarkFlat". More” (Master DarkFlat) is used to calibrate the flat frames.
- a “dark frameA "dark frame" is shot in the dark (so e.g. covering your camera) with the same exposure as your light frames (e.g. 180sec, 300sec, 600sec) and contains the dark signal (and the so called "thermal noise", if not -properly- cooled). Those frames allow you to remove the sensor noise from your light frames, but also to tackle pixel errors (hot and cold pixels). The combination/stack of multiple dark frames is called a "Master Dark". More” (Master Dark) contains the dark signal and the so called “thermal noise” if your sensor is not properly cooled. Besides that, they’ll also allow you to tackle hot and cold pixels.
There are also so called “BIAS frames“, but I’m not covering them here.
2.3) When to take calibration frames
As a summary, I’d like to highlight the following;
- flat frames and darkflat frames should be taken for each session (where a session is not only limited to one night!). There is no general rule that applies.
- a set of dark frames can be taken once per exposure time (e.g. 180sec, 300sec, 600sec) and then serve as a library for multiple future sessions.
There are a lot of great tutorials available – so if you’re interested make sure to check them out!
3) Session preparation with Sequence Generator Pro (SGP)
At this point I assume that you’re familiar with deepsky object target selection and know how to plan your astrophotography sessions properly. At the time of writing this blogpost, I’m collecting data (light frames) for multiple objects;
The reasons for shooting multiple deepsky objects in one night are;
- optimizing the output of a clear night based on the “three astrophotography conditions“
- making use of altitude charts that I’ve described in the second post of this series
Remember, we’re looking for quality, not quantity. So I always aim for (less) light frames in the best possible quality, rather than a vast amount of data which is not usable.
4) Live Session Example – IC1396 and M51
4.1) IC1396 – “Elephants Trunk Nebula”
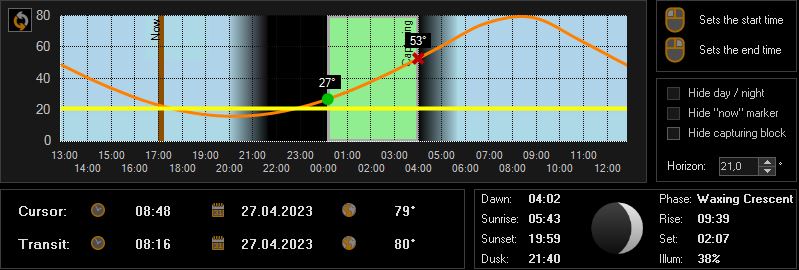
I’m favoring IC1396 based on its rise over 27° above horizon – so that deepsky object is our starting point. For more details on that threshold please see the first post of this series.

As you can see in [Image 1] I defined the start time as soon as IC1396 rises above 27° over the horizon, which would be roughly at 00:10 in the morning. The end time has been set to 04:00 as SGP tells us that dawn begins at 04:02 (for more details on twilight please check out the section in the second post of this series).
4.2) M51 – “Whirlpool Galaxy”
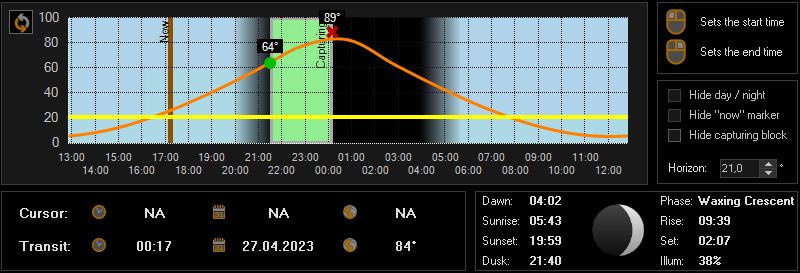
That leaves us with an “empty timeframe” between 21:40 (=dusk) and 00:10 (=when then integration of IC1396 starts). To find proper targets, I had a look into Telescopius and chose M51, because I need RGB light frames of IC1396 anyhow. A perfect match so to say :)!
Explanation: I don’t have an electronic filter wheel (yet) that would change filters (RGB<->dual-narrowband) automatically based on the configuration in SGP. So if I needed to shoot M51 with RGB and IC1396 with my dual-narrowband filter in the same night, I would need to set an alarm to midnight and manually change the filters. An electronic filter wheel takes care of that for you. So, as part of my session planning, I always shoot multiple objects with the same filter per night.

[Image 2] shows that it would be possible to shoot M51 throughout the whole night, but I also want to finish collecting data for IC1396. So I’ve configured SGP to start taking light frames at 21:30, 10 minutes before dusk.
Explanation: I always set “dusk minus 10mins“, because SGP needs to center on target and run auto-focus before starting “integration”. As stated earlier I really want to use the integration timeframe to the best possible extent.
4) Preparing the observatory
I want to really keep this section short, because it varies from observatory to observatory and site to site. In my case, I can simply “roll off” the roof of my observatory and that’s it. Afterwards I’m powering up my mount, my astrophotography cameras (main and guiding(Auto-)Guiding is essential in astrophotography, as an un-guided mount/telescope will produce blurry images as the stars / the deepsky object will drift away. This is heavily dependent on the exposure time, so for long exposures you want to make sure to have a perfectly set up auto-guiding. More) and my auto-focuser. Once you have configured your “equipment profile” in SGP, it allows you to connect to all devices at once.
I usually do this minimum 30 to 60 minutes before the integration starts to allow my equipment to cool down and acclimate.

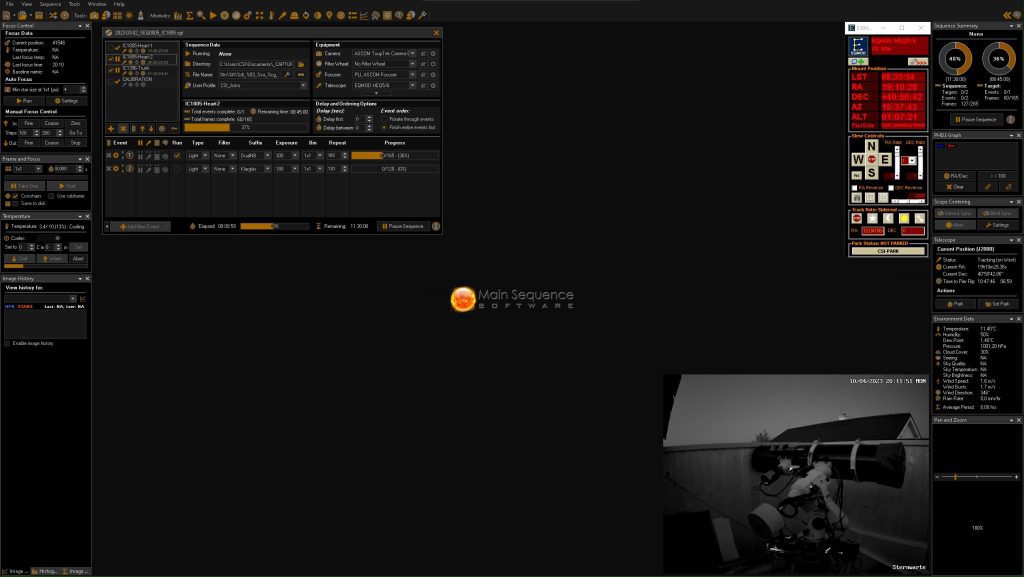
[Image 3] shows SGP waiting for the integration start and already connected to all mydevices. The astrophotography camera is automatically cooling down to -10°C on connect and the mount is unparked via EQMOD. Also PHD2 is waiting for the command to start guiding(Auto-)Guiding is essential in astrophotography, as an un-guided mount/telescope will produce blurry images as the stars / the deepsky object will drift away. This is heavily dependent on the exposure time, so for long exposures you want to make sure to have a perfectly set up auto-guiding. More. In the lower right corner you see a livestream of my surveillance camera that I’ve installed to check if everything is fine.
5) What a raw light frame looks like
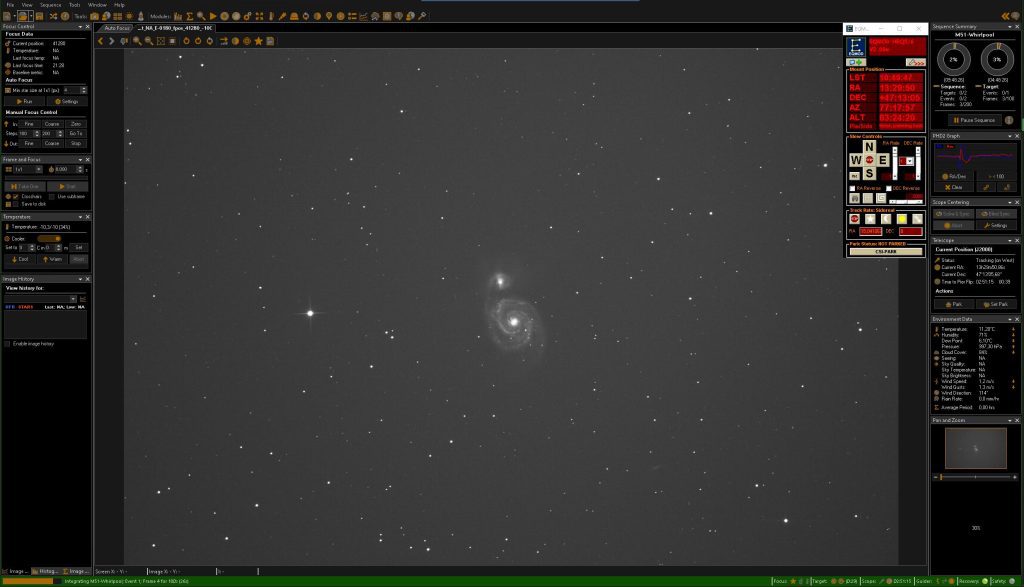
The following [Image 4] is an un-processed RAW image displayed in SGP. It was “stretched” (the process of making faint information visible – to keep it very simple) to see what’s in the image.

As you can see it’s in B/W, because it has not been de-bayered yet (I’ve described the Bayer-matrix briefly in the first post of this series).
Closing Words
In this blogpost we had a first look in how to shoot deepsky objects.
- I’ve described the different types of frames in astrophotography
- I showed you how I planned my astrophotography session for both IC1396 and M51 in one night
- I listed what I do to prepare my observatory
- Finally, I showed you a raw light frameA "light frame" is basically an image that contains all the information you want to have in your final picture, e.g. a nebula, a galaxy, a comet. More without any further processing
In the next post of this series, I will show you some basic pre-processing steps. CS!