1) Introduction
This blogpost will show you my workflow for planning an astrophotography session.
In the first post of this series, I explained the “three astrophotography conditions“, so make sure to check it out before reading!
You can see all posts of the series “Plan to Pre-Process” here.
Sidenote; I’m a hobby/amateur astrophotographer. It’s my intention to highlight the basic aspects of astrophotography and explain them to beginners. In other words it’s my hobby and I’m maintaining this website in my free time. So bare with me if some content is outdated, at the time of writing I’m showing what I’m doing to achieve results that I’m happy with. Those blog entries are written in English and are automatically translated into German with DeepL.
2) Planning an Astrophotography Session with Telescopius
Given that the weather and seeing conditions allow an astrophotography session, usually the first thing I do is to check Telescopius. Make sure your “observatory settings” there in the top left corner are correct. You can easily set the corresponding LAT/LON coordinates there. If you’re not sure about them, just go to Google Maps, navigate to your observatory site and right-click on the location. You will automatically see LAT/LON for the specified point of interest.
Based on these settings, Telescopius offers e.g.;
- weather and seeing forecasts
- filter-able target lists/suggestions
The next chapter will focus on weather and seeing.
2.1) Telescopius’ weather and seeing forecasts
Unfortunately the upcoming nights here at my observatory wouldn’t allow any astrophotography session – you can clearly see below in [Image 1] that both clouds and the moon are currently causing “troubles”;
2.2) Telescopius’ filterable deep-sky object target list
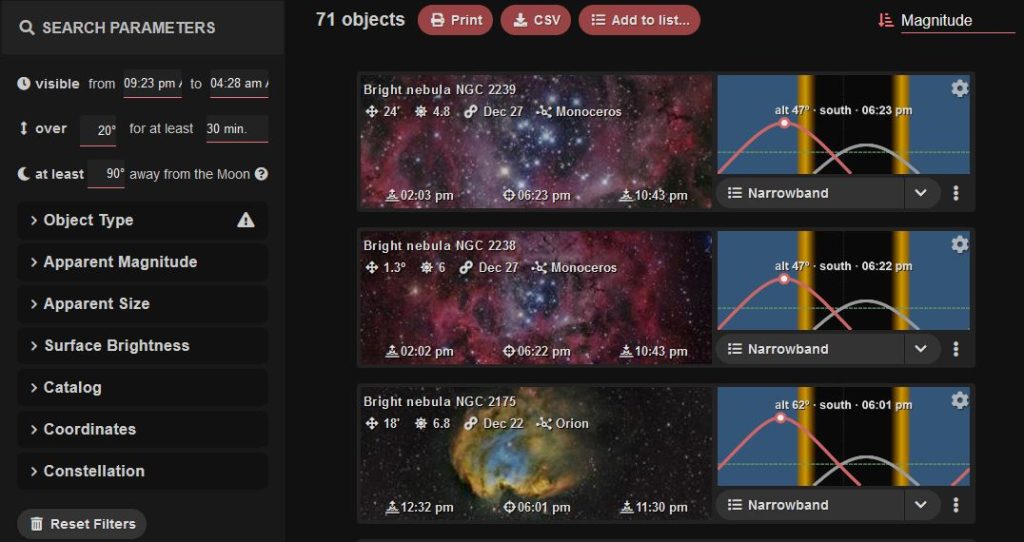
So, let’s assume – for this post – that conditions are good and take a look into Telescopius‘ target list feature for planning an astrophotography session. You can filter the suggestions/targets based on;
- visibility (from-to, also interesting for multi-target sessions)
- degrees above horizon, together with a minimum time (my “feature #1” and heavily used)
- degrees away from the moon (to tackle possible over-exposure due to certain lunar phases I’ve described in the first post of this series)
- object type (nebulae, galaxies, clusters, …)
- further (secondary) parameters like magnitude, size, etc.
The following [Image 2] shows how the target list on Telescopius looks;
If you like, you can use my Telescopius narrowband observing list as a starting point.
2.3) Altitude Charts
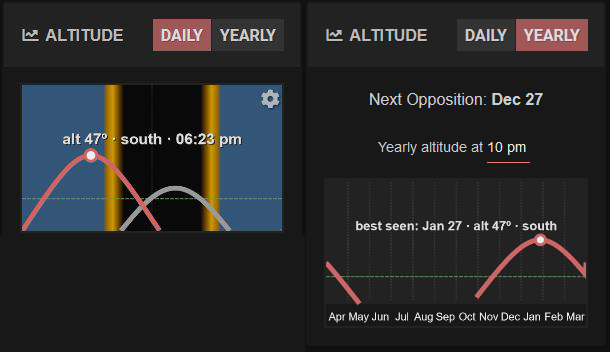
Before we continue with our journey, let me make one thing clear – the altitude of deep-sky objects changes throughout the year (see also in [Image 3] below). It’s important to know that for planning an astrophotography session, because if an object is not optimal to shoot right now, conditions may be better later on if it’s visible in your hemisphere. You can check altitude charts at e.g. the target page for NGC2239 for the whole year if you change the mode from “daily” to “yearly“;
“OK, so everything is good – when should I start my astrophotography session?” – let’s answer that question in the next chapter!
2.4) From day to night or “when to start your astrophotography session”
You want to start your astrophotography session;
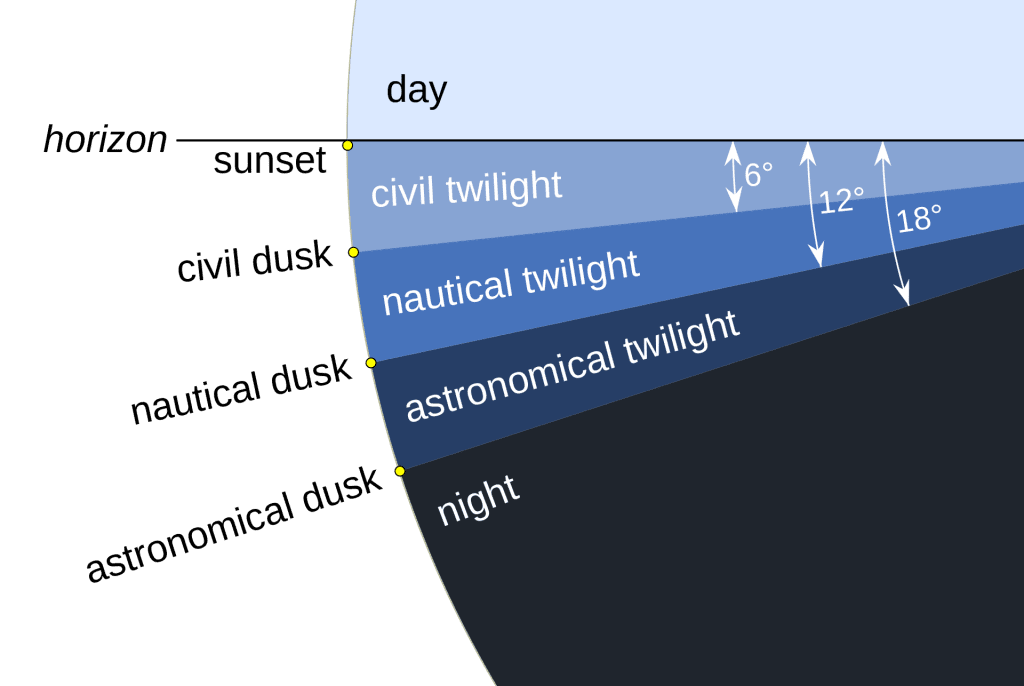
- after “nautical dusk“
- and earliest during the “astronomical twilight“, which begins when the sun is below 12° under the horizon
To check the times for your location, you can;
- visit timeanddate.com
- use Stellarium
- or any astrophotography software like Sequence Generator Pro where you see a visualization in the so called “planning tools”
The following [Image 4] visualizes, based on the degrees of the Sun below the horizon, when specific phases of dusk begin.
With that knowledge, let’s now (finally) have a look into a real life example!
3) Planning an Astrophotography Session with NGC2239 as an example
We will use NGC2239 (“Rosette Nebula”) as an example for planning an astrophotography session. I have chosen that one in particular, because currently it’s not an optimal target to shoot, but perfect to show what you need to take into consideration in your planning phase.
Sidenote: if you’re interested, I already have collected data for NGC2239, stacked and processed it. The final (dual narrowband only) result of my first revision can be seen in the NGC2239 Rosette Nebula (Rev. 1) portfolio page.
What you can already see in [Image 2] above is that there’s only a small timeframe where we can shoot that object as;
- its transit (the “peak”) is even before sunset (the left yellow-ish vertical bar)
- roughly at 22:00 it would drop my below my 27° above horizon minimum threshold (which I described in the first post of this series) for the rest of the night
Having that said those circumstances would leave us today with only 1h to collect data from ~21:00CET (current begin of nautical dusk) to ~22:00CET (object is below 27° above the horizon). My NGC2239 Rosette Nebula (Rev. 1) was stacked with 04:45h of exposure, so in other words it would need at least 5 nights (these days) to get the desired amount of data.
3.1) Single panel or mosaic?
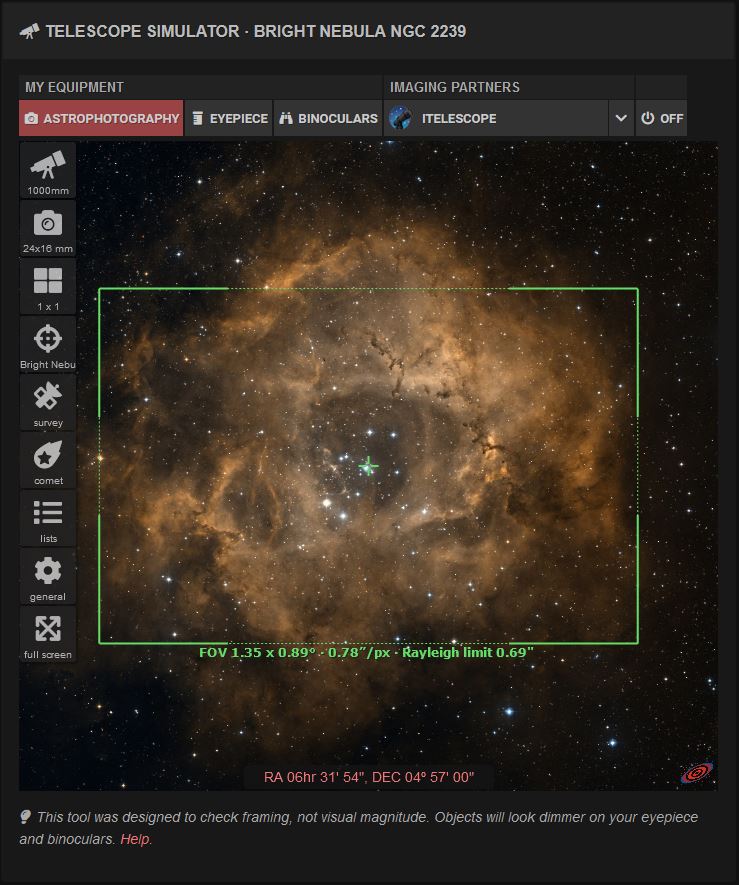
As already mentioned in the “DSO conditions” in the first post of this series, you need to check if your current setup (telescope and astro-camera) is able to frame the object in a single panel or if you need to shoot a so called “mosaic”. For our example (NGC2239) it’s sufficient to shoot a single panel – based on my current setup (you can find the full details on the equipment I’ve used in the NGC2239 Rosette Nebula (Rev. 1) portfolio page);
- Skywatcher 200PDS Newton (200mm/1000mm, f/5)
- Touptek DeepSky Pro 2600c
I’ve created my setup in my Telescopius profile, which allows me to quickly set framing in the Telescope Simulator for NGC2239;
Sidenote; I’m currently shooting IC1805 (Heart Nebula), where I need to create a “1×2” mosaic. It’s definitely possible to only work with 1 panel, but therefore you need a telescope that’s more “wide-field” capable;
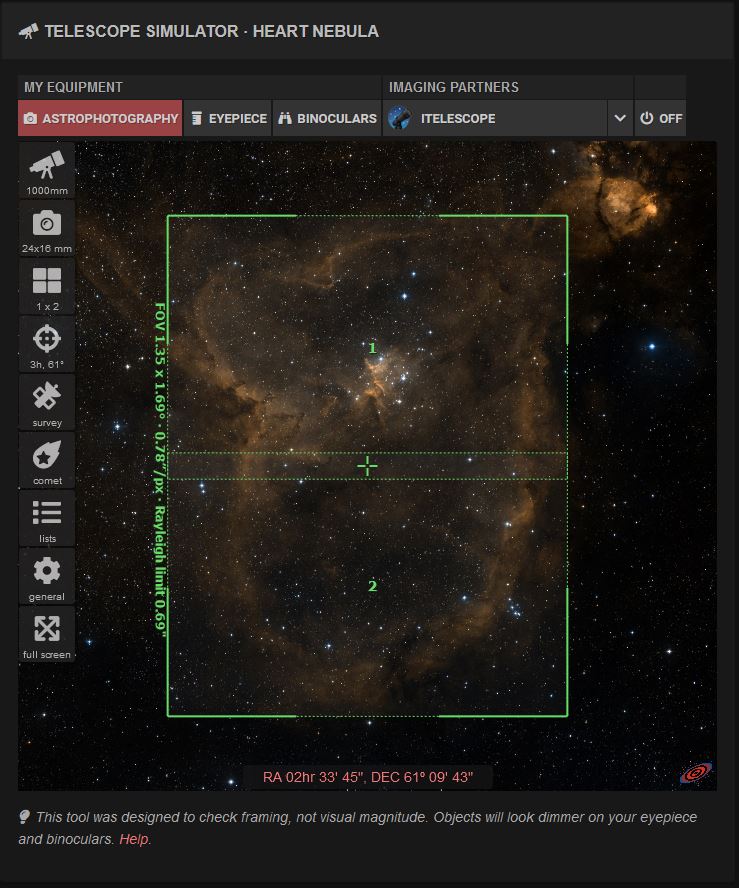
So, as IC1805 (Heart Nebula) is a so called emission nebula with strong HalphaH-alpha (Hα) is a deep-red visible spectral line of the hydrogen atom with a wavelength of 656.28 nm in air and 656.46 nm in vacuum. It is the first spectral line in the Balmer series and is emitted when an electron falls from a hydrogen atom's third- to second-lowest energy level. H-alpha has applications in astronomy where its emission can be observed from emission nebulae and from features in the Sun's atmosphere, including solar prominences and the chromosphere. (Source: Wikipedia) More signal (ionized hydrogen gas), I need to shoot each panel with..;
- a dual narrowband filter (approx. 165 frames x 300sec ~= 14,0h)
- a clearglass filter (approx. 80-100 frames x 180sec ~= 4,5h)
..and that sums up 18,5h of exposure per panel or 37,0h of total exposure for the whole astrophoto. I think this makes it pretty clear now how important it is to get the best out of your astrophotography session.
4) Summary
Let me briefly go through to main points of this blog post;
- I showed you how to use Telescopius as a further source of information to research weather and seeing conditions, based on your LAT/LON coordinates
- We had a look into Telescopius‘ target selection tool and the filter options you will find there, based on your LAT/LON coordinates
- I’ve highlighted that it’s very important to keep track on altitude charts in order to plan your astrophotography sessions throughout the year
- We had a look into the different stages of dusk, but the most important for you is to plan your astrophotography session after the “nautical dusk” and earliest during the “nautical twilight” which begins when the sun is below 12° under the horizon
- For our example, NGC2239, we took its altitude charts into consideration and verified that we can frame the object in a single panel (vs. mosaic)
To close this blog post I wanted to show you how you can check for obstructions with Stellarium.
5) (Optional) obstruction check with Stellarium
In Stellarium there’s the possibility to load a custom horizon file. There are lots of excellent tutorials, like from my friend Daniel Nimmervoll where he shows you how to use actual images for your custom Stellarium landscape (in German).
I’ve kept it rather simple and used an (iOS-only) app called Theodolite to create my custom horizon/landscape. Maybe I’ll create a how-to later, but this is how my Stellarium looks like;
Description: Stellarium is centered on NGC2239 and frames were captured every 30mins to create the [Animation 1] above. The dark area at the bottom can be considered as “seeing obstruction”.
So as you can see during the time from 21:00CET to 22:00CET we are not expecting any obstructions and we have a “Go” for our planning!
Closing Words
In the next part of this series we will have a look into how your planning could be incorporated in an actual astrophotography session. I know there’s much to take into consideration, but no worries – we will have a look into all of that, step by step and one at a time. CS!

